The Kimi Open Platform natively supports the Responses API used by Codex, so Codex can use Kimi models directly — no protocol conversion or local proxy is required. This guide walks you through the complete setup on macOS and Windows.
What is Codex?
Codex is OpenAI's coding agent for repository and terminal work. It can:
Write code: Create functions, tests, scripts, and focused features.
Understand unfamiliar codebases: Search files, trace calls, and explain components.
Review code: Identify likely defects, risky assumptions, missing tests, and security concerns.
Debug and fix problems: Reproduce errors, propose changes, and run checks.
Automate routine work: Update files and execute documented workflows with your approval.
Install and sign in to Codex
Part 1: Install Codex CLI
Open Terminal on macOS or PowerShell on Windows.
Run the command for your operating system:
macOS:
Windows:
Wait for the installation to finish, then close and reopen Terminal or PowerShell.
Run:
Select Sign in with ChatGPT, complete the browser sign-in, and return to Terminal or PowerShell. A free ChatGPT account is enough for this sign-in; no paid subscription is required. The external Kimi route you configure later does not use OpenAI billing.
Part 2: Install the Codex desktop app
Visit the official download page at https://chatgpt.com/download and download the desktop app for macOS or Windows. Codex is included as a work mode inside the ChatGPT desktop app — the app you download is named ChatGPT.
Install and open the app, then sign in with your ChatGPT account.
Create a task or open a project and select Codex as the work mode.
Enter
Say hello in one sentence.and send the message.
Built-in AI models vs. external LLM APIs
After installing Codex, you can use its built-in AI models or connect a compatible external LLM API. The best option depends on how much setup, flexibility, and account management you want.
Use Codex built-in models
Built-in models provide the simplest experience. You can select an available model and begin coding without running another service or configuring a separate API key.
Advantages:
Quick setup with no additional configuration steps.
Direct integration with Codex tools and features
Fewer services and credentials to manage
Limitations:
You can only choose from the models available to your account
Less flexibility if you want to use a model from another provider
Requires signing in with a ChatGPT account. Free plans include limited Codex access, but regular use generally requires a paid ChatGPT plan (such as Plus or Pro) or an OpenAI API key billed by usage.
Use an external LLM API
An external API gives you more model choices and lets you use an existing account with another provider. The Kimi Open Platform natively supports the Responses API used by Codex, so the connection is direct — no local router is required.
Advantages:
Access to models from other providers
More flexibility for different coding tasks
Separate control over the external API account and usage
No GPT subscription required. Ideal for cost-sensitive scenarios.
Limitations:
Requires an API key and a small configuration change
Billing, compatibility, privacy, and troubleshooting depend on the external provider
If you want the fastest setup, start with a built-in model. If you already have an external API account or want more model choices, continue with the following walkthrough.
How to Connect an External LLM API to Codex: Kimi Example
Step 1: Create a Kimi API key
Open the Kimi API platform. Create an API key from the console, then store it in a password manager or secret manager. The full key is shown only once — copy it before leaving the page.
Note: The Kimi API is a paid, pay-as-you-go service. Make sure your account has available balance before testing — check or top up under Billing in the console. A new API key alone does not enable calls if the account balance is zero.
Step 2: Set the KIMI_API_KEY environment variable
Codex reads the API key from an environment variable. Do not write the key into config.toml.
macOS and Linux:
To keep the key out of your shell history, enter it as follows:
This only applies to the current terminal session. To persist it, add the export command to ~/.zshrc (or ~/.bashrc if you use bash on Linux). The file stores the key in plain text — set permissions accordingly.
Windows (PowerShell):
Replace YOUR_KIMI_API_KEY with the key you copied in Step 1. To persist it across sessions, add KIMI_API_KEY under Settings > System > About > Advanced system settings > Environment Variables.
Step 3: Add Kimi as a model provider
Open the user-level Codex configuration file: ~/.codex/config.toml on macOS and Linux (on Windows: %USERPROFILE%\.codex\config.toml). If the file does not exist yet, create it.
Add the following configuration. If model or model_provider already exist, replace their values, and delete any line beginning with model_catalog_json = or service_tier = (leftover lines from other setups can override your model metadata or routing):
If your API key was created on the China platform (platform.moonshot.cn), use https://api.moonshot.cn/v1 as the base_url value instead — keys are not interchangeable between the two platforms.
Keep unrelated existing settings (such as notify, approval, sandbox, project, and interface preferences) unchanged, and do not remove other provider sections such as [model_providers.openai].
What each setting does:
| Setting | Type | Purpose |
|---|---|---|
wire_api = "responses" | string | Connects to Kimi through the native Responses API — the key setting for the direct connection |
env_key = "KIMI_API_KEY" | string | Name of the environment variable Codex reads the API key from |
model_context_window = 1048576 | integer | Matches the 1M context window of kimi-k3; without it, Codex falls back to default model metadata, which can degrade performance |
Step 4: Restart Codex and verify the connection
Codex only reads config.toml at startup, so fully exit any running Codex session first. Then enter your project directory and start Codex:
After startup, confirm that Codex CLI shows kimi-k3 as the current model:
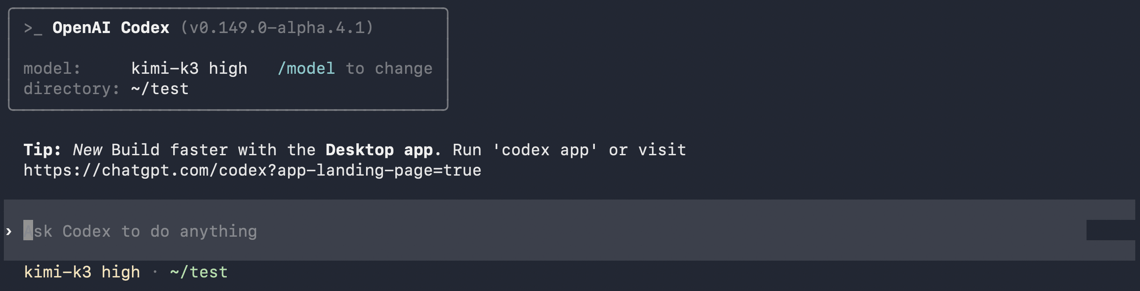
Send a simple request (for example hello). A normal reply confirms that Codex is connected through the Kimi Responses API.
To confirm the reply really came through Kimi, check that the session shows kimi as the provider — for example by typing /status inside the Codex session. Under the hood, Codex sends requests to POST https://api.moonshot.ai/v1/responses.
Use Kimi in the Codex desktop app
The desktop app shares the same user-level configuration as the CLI. Complete Steps 1–3 above first, then:
Step 1: Fully restart the desktop app
On macOS, press Command+Q to quit the desktop app completely. Closing only the window is not enough.
On Windows, close every desktop app window and confirm that the app is no longer running in the system tray.
Reopen the desktop app so it reloads ~/.codex/config.toml, and open a project folder.
Step 2: Keep the Custom model selected
Open the model picker and select kimi-k3. The interface may show Custom instead of the model name — this is expected. Custom providers defined in config.toml are not always displayed by name in the desktop model list, but requests still use the kimi-k3 you configured.
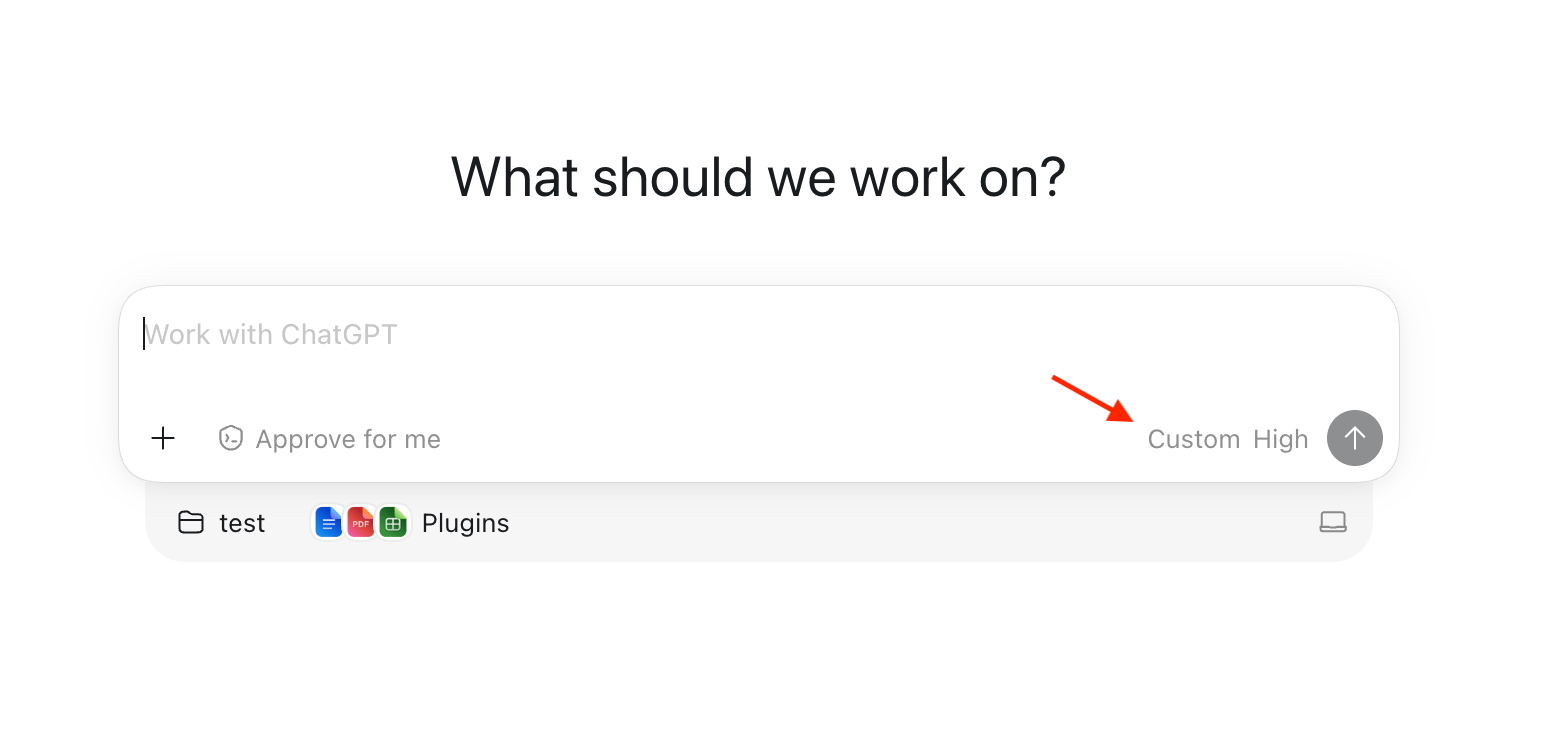
Step 3: Verify the desktop request path
Send a simple request like hi — a normal reply means the basic connection works:
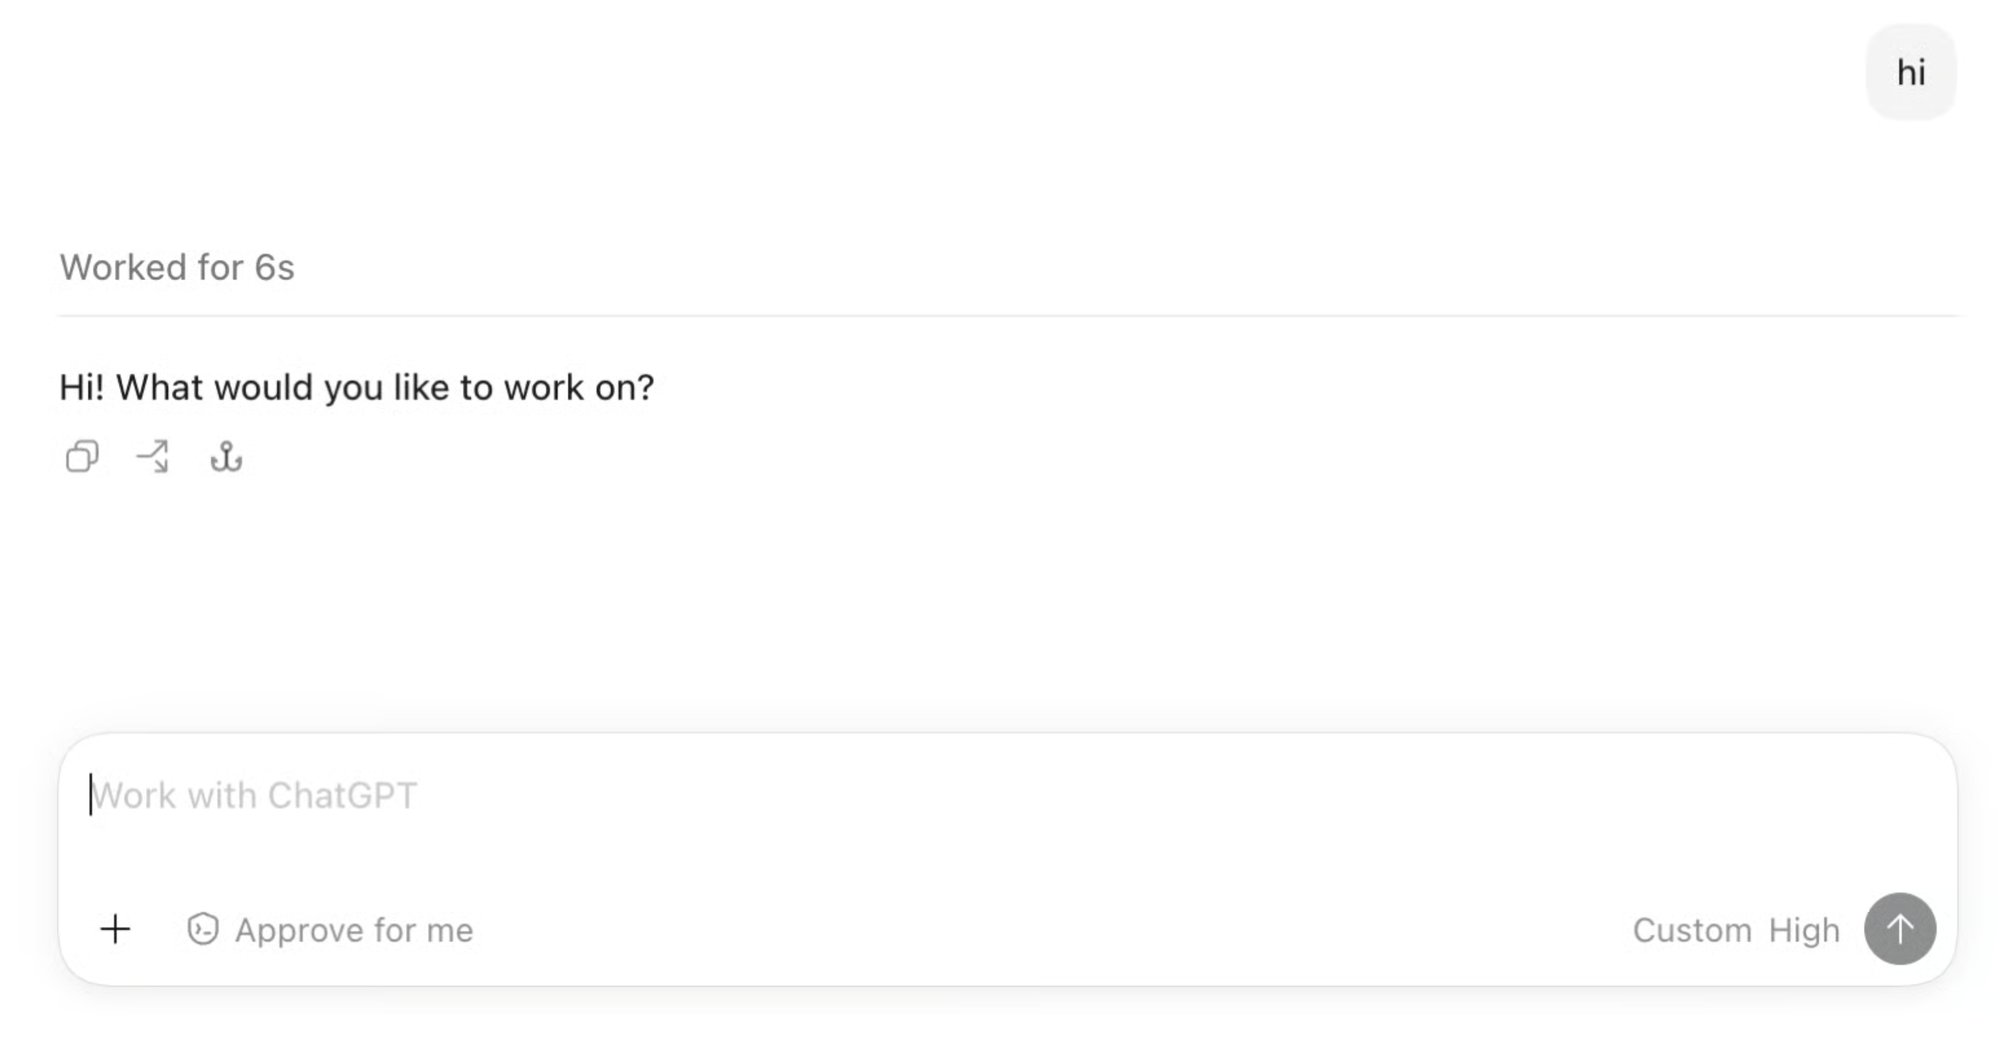
Next, send a task that exercises Codex's agent capabilities:
If Desktop continues generating a final answer after the tool results come back, model calls and tool calling are working properly.
Troubleshooting common integration errors
Still seeing "Missing environment variable" after setting it
Codex sessions connect to a background app-server daemon whose environment is captured when the daemon starts — not when you start a session. If the daemon was already running when you set KIMI_API_KEY, it will not see the variable even if your current terminal shows it as set. On macOS, write the variable into the GUI session environment and restart the daemon:
Then start Codex again. On Windows, sign out and back in (or fully restart the desktop app) after setting the variable system-wide.
401 Unauthorized
The API key is invalid, or the key and the base_url belong to different platforms — API keys created on platform.kimi.ai only work with https://api.moonshot.ai/v1, and keys created on platform.moonshot.cn only work with https://api.moonshot.cn/v1. Also confirm that KIMI_API_KEY is available in the environment used to start Codex or Desktop. For the CLI, check it in the terminal where you start Codex:
400 web_search.search_context_size is not supported
The request includes the search_context_size parameter, which is not supported yet — remove it. Codex does not send this parameter by default, and the built-in web_search tool works out of the box.
404 on /v1/responses
base_url is wrong — make sure it is exactly https://api.moonshot.ai/v1 (with the /v1 suffix). If you previously connected through CC Switch or another local router, also confirm base_url no longer points at a local address such as http://127.0.0.1:....
429 Rate Limit
You have hit a rate or concurrency limit. Check your tier's quotas under Limits in the Kimi API platform console.
Warning: Model metadata for kimi-k3 not found
kimi-k3 is not in Codex's built-in model catalog. This warning is expected and does not affect usage — the model_context_window = 1048576 from Step 3 already ensures the context window is treated as 1M.
Configuration changes do not take effect
Codex only reads config.toml at startup — exit and restart it. Also confirm you edited the user-level ~/.codex/config.toml itself and that no -c flags or profiles are overriding it. If you previously connected through CC Switch, also turn off Codex under its Settings > Routing — otherwise it keeps rewriting config.toml and overwrites the new configuration.
Benefits of using Kimi API
Using Kimi in Codex API workflows can improve coding, debugging, and development tasks. Its advanced capabilities help generate accurate responses, handle complex instructions, and support faster problem-solving. Here are the key benefits of using Kimi in Codex workflows to boost productivity and efficiency.
Long-context code understanding
Kimi can process large amounts of code and information at once. It recognizes relationships between different files and project sections more effectively. As a result, working with large or complex codebases becomes much easier.
Better documentation and repository analysis
Project documents, technical notes, and repositories can be reviewed quickly with Kimi. Important details are easier to find without going through every file manually. Developers can gain a clearer understanding of the entire project in less time.
Cost-effective AI development
Kimi gives a practical and budget-friendly option for handling many development tasks. Powerful AI support is available without depending entirely on higher-cost models. Teams can improve overall productivity while keeping expenses under better control.
Faster knowledge retrieval
Useful information can be located quickly across large codebases, datasets, and project files. Less time is spent searching through resources for answers or references. More attention can be given to coding, testing, and project improvement.
Improved workflow automation
Repetitive development tasks become easier to manage and complete with Kimi. It can assist with code generation, content review, and routine project activities. Daily workflows stay organized, efficient, and more productive over time.
How Codex improves the development workflow
A configured Codex CLI API workflow connects repository inspection, editing, commands, and review in one context. Codex can scaffold files, explain unfamiliar modules, reproduce failures, propose tests, and run approved checks. External provider support adds model choice but does not remove review responsibility.
Start each task with a narrow goal. Ask Codex to inspect before editing, review its proposed changes, approve only commands you understand, run the repository's tests, and inspect the final diff. Treat generated code as an untrusted contribution until it passes review and verification.
Conclusion
Reliable Codex API usage comes from testing each layer in order: create and fund your Kimi account, set the API key in your environment, save the user-level provider configuration, restart Codex, and verify with a simple prompt before moving on to agent tasks. Keep the key in the environment variable rather than in config.toml, and never publish a real key.